Azure – Managing Resources Using Resource Groups

In this blog, I just wanted to share some tips which people can use to manage resources in Azure via Resource Groups. Resource Groups in Azure users can help users in organizing the resources in a much better way. It can help them not only in development but also helps them in better monitoring of the resources, there maintenance and the associated cost.
Mentioned below are some of the points which people can use to organize their resources better

a) Always create resource groups in Azure to manage the different environments of dev, test, uat and production. Also do not create unnecessary resource groups.

This ensures that there is a good level of segregation between the components in azure and people can easily develop and deploy resources in dev without impacting the other components in test, uat and production.

With this approach, if developers needs to flush out the entire resources in a particular environment, they can just do it by deleting the respective resource group

b) Provide access to only relevant people in each resource groups. This can be managed by either providing them access as a standalone user or as a team.

This segregation can help avoid unauthorized access and update of components by mistake.

c) While deploying the resources, it’s always beneficial to tag resources. This can enable better monitoring of the environment. For example using tags we can monitor the usage and costing of respective resources.

Please read the mentioned below Microsoft blog for better understanding on resource groups
https://docs.microsoft.com/en-us/azure/azure-resource-manager/resource-group-overview

Microsoft Dynamics Portals – Setting Value in a Lookup Attribute

In Dynamics Portal’s we can use the mentioned below syntax to set value in a lookup attribute

In the code example below, attribute needs to be replaced with the schema name of the attribute.
txtName , txtID and txtEntityName needs to be replaced with the name, guid and entityname of the record which you are setting in the lookup attribute.

$(“#attribute_name”).attr(“value”, txtName);
$(“#attribute”).attr(“value”, txtID);
$(“#attribute_entityname”).attr(“value”, txtEntityName);

Microsoft Dynamics Portals – How to Clear a Lookup Attribute

In Microsoft Portal’s sometimes we need some logic to clear values in a lookup attribute.

In such cases we can use the mentioned below code snippet to do the same

$(“#attribute_name”).attr(“value”,null);
$(“#arrtibute_id”).attr(“value”,null);
$(“#attribute_entityname”).attr(“value”,null);

“attribute” is the schema name of the lookup record in Dynamics.

Microsoft Dynamics Portals – Configuring Multi Steps in a Web Form Step

There is a property present in the web form step using which the different tabs in an Entity form will appear as separate steps.

This property comes in use when the web form step which needs to be configured is having a lot of information. In some cases, exploring the need to configure different web form steps can also be explored.

However with the below property, we will have just one web form step and still have different steps. Having different steps makes it possible to save information in small chunks i.e. steps and then come back to the web form.

As a prerequisite for this,

a) The Type of the Web form Step, should be selected as “Load Form”.

Web Form Step Type

b) Along with that the property “Auto Generate Steps from tabs” should be selected as well

Web Form Step

c) Once all this is done, navigate to the Web Form and move to the web form step.

Review that for the selected form all the tabs are displayed as separate steps in the same web form step

WEB Form Step 1

Web Form Step 2

Using Azure Log Analytics to Monitor Azure VM’s

Log Analytics can be used for monitoring the availability and performance for applications deployed on Azure Cloud.

In my last engagement we explored the idea of using Azure log analytics for monitoring the performance of Azure VM’s. So just wanted to share some useful links for the same

Azure Log Analytics Overview

https://docs.microsoft.com/en-us/azure/log-analytics/log-analytics-overview

Configuring Azure Logs on the Azure VM

https://docs.microsoft.com/en-us/azure/log-analytics/log-analytics-quick-collect-azurevm


Dynamics Virtual Entities – ODATA V4 Data Source – Using Request Parameters

Virtual entities is a recent feature introduced by Dynamics. Using Virtual entities , we can connect to external data source providers and provide them in a Dynamics GUI just like any other entity.

In the Virtual entity we can configure the source as an ODATA V4 provider.

In this particular blog, we will go through an example wherein we will utilize the Query Parameters present in the ODATA V4 Provider data source and show how we can implement a custom security using them.

In the mentioned below example, we will just create an ODATA Web API which will be consumed in the Virtual entity ODATA Source Provider.

For the sake of just explaining the concept, we will just go through the ODATA Controller and not the complete source code which will create the data to be shared with Dynamics.

Step 1 – Creating a Custom Authorization Class.

In this class, we will inherit this class with “AuthorizeAttribute” class available in namespace “System.Web.Http.AuthorizeAttribute”.

We will then override the method “OnAuthorization”. In the implementation, we will read the header variables present in the request. The key specified in the request header will be used later while setting up the virtual entity ODATA Provider source in Dynamics.

// Custom Authorization Class , which is implementing the class AuthorizeAttribute 

public class CustomAuthorizationClass: AuthorizeAttribute
    {
       
        // In the class we will override the method “OnAuthorization”
        public override  void OnAuthorization(HttpActionContext actionContext)
        {
           // Name of the request header parameter
            var key = “token”;
            
            try
            {
                // Reading from the request header key value pairs
                var headers = actionContext.Request.GetQueryNameValuePairs().ToDictionary(x => x.Key, x => x.Value);
                // Token object passed from Dynamics. 
                var token = headers.SingleOrDefault(x => x.Key == key).Value;
                // This can be used for any custom authentication.
            }
            catch
            {
                actionContext.Response = new HttpResponseMessage(System.Net.HttpStatusCode.Forbidden);
            }
            
        }


Step 2 – Adding Custom Authorize Attribute on the ODATAController.

Mentioned below is the code snippet for the same

[CustomAuthorizationClass] // Name of the Custom Authorization Class
public class VirtualEntitiesController : ODataController
{
        [EnableQuery]
        public IQueryable<VirtualEntity> Get()
        {
            // This function will be called when any View like Advanced Find , Associated View of the entity is opened
            // return entitycollection;
        }
        public IQueryable<VirtualEntity> Get([FromODataUri] Guid key)
        {
           

           // This function will be called when any record of Virtual Entity is opened
            // return record based upon the key;
        }
 }


Step 3 – Specifying the custom request header while Setting up the OData V4 Data Source

Please refer to the below screenshot which shows how we can specify the header parameter in the query header parameters

a) Navigate to Settings -> Administration -> Virtual Entity Data Sources. Click “New” to create a new Data Provider

Virtual Entity OData Provider

b) Click “Ok”. In the tab “Request Parameters”, Create a new parameter with Type as “Header”, Name as the “token” key specified in the code in step 1 and value.

Query Parameters

Azure Text Analytics API’s and Usage in Dynamics CRM

Using Azure Text Analytics API’s , we can set up processes that can analyze keywords during an interaction with the customer and provide some insights on the overall experience of the customer.

Text Analytics API demo is available on the following URL

https://azure.microsoft.com/en-us/services/cognitive-services/text-analytics/

As illustrated in the demo, we can analyze the text entered and share insights in terms of  Language Detected, Sentiment etc

We can also configure these API’s in azure cloud and then consume them in our applications.

Mentioned below are the steps to configure the Text Analytics API in the azure cloud environment

a) Navigate to azure portal, create a resource and select the category as “AI + Machine Learning”.

Text Analytics API's

b) We can then enter the details and the API’s will be configured. We will need to copy the API endpoint and an access key which we will then need to call them programmatically.

Mentioned below link explains how we can write a C# code for the same

https://docs.microsoft.com/en-us/azure/cognitive-services/text-analytics/quickstarts/csharp

              Usage In Dynamics CRM

We can use the Text Analytics API in many functionalities in Dynamics. For example,

Service Request Scenario

a) Saving last Customer Interaction on a Service Request – While working with a customer on a particular service request, the customer care executive can capture the interaction is some placeholder like Notes or Annotation.

b) On save of the request, we can call the API endpoint and capture the sentiments to classify whether the interaction was “Positive”, “Negative” or “Neutral”.

c) Now when the customer calls again, based upon the previous sentiment analysis with the customer, the customer care executive can drive the conversation.


Caching in Azure Functions

Problem Statement –

Azure Functions are stateless in nature. Therefore even though we can use the standard.Net objects to cache values, they don’t persist if the Azure Function scales out or is idle for some time.

In many cases, Azure Functions are used for doing some integrations with other applications. For example, we may have an integration scenario in which we make calls to OAuth Rest API’s. In these cases, we may need to preserve OAuth2 bearer tokens in Azure Function.

Approach – We have some approaches for doing caching in Azure Functions.

a) Using standard Memory Objects – For example, we can create static objects like the dictionary for caching the values.

However as indicated previously, if the function is idle for some time or scales out, the cached value will be lost.

As a side note, below is the code snippet shows how we can implement assembly caching to save values

// Use the mentioned below statement to include required classes

using System.Runtime.Caching;

// Static object in which we will save the cache

static readonly ObjectCache tokenCache = MemoryCache.Default;

// Retrieving existing value in the cache

CacheItem tokenContents = tokenCache.GetCacheItem(TokenKey);
if (tokenContents == null)
{

// Branch when cache doesn’t exist. This would mean we need to regenerate it.
CacheItemPolicy policy = new CacheItemPolicy();
policy.Priority = CacheItemPriority.Default;

// Setting expiration timing for the cache
policy.AbsoluteExpiration = DateTimeOffset.Now.AddHours(1);
tokenContents = new CacheItem(TokenKey, tokenResponse.access_token);
tokenCache.Set(tokenContents, policy);
}
else
{

 // Branch to retrieve existing value present in the cache
Token = tokenContents.Value.ToString();
}

b) Using Redis Cache – Its managed by Microsoft is highly scalable and provides super fast access to data. Performance wise it can be good but from the pricing perspective, it can cost more than the other options.

c) Using tables in Storage accounts – For an Azure Storage account, we can create tables and properties. These properties can then be used for saving any information. 

Using this approach results in an extra API call to retrieve the value in the Azure storage table but pricing will be less than the Redis Cache.

Mentioned below screenshots show how we can configure an Azure Storage account

  • Navigate to Microsoft Azure Storage Explorer and enter the credentials for access in the Azure account. Review that it loads all the available storage accountsAzure Storage Account
  • Click on the Azure Storage account for which we need to add the storage table. Review that it will display the existing tables present in the accountAzure Storage Account Table
  • Right click “Table” and click on “Create Table”. Give a default name of the table. Review that the table gets created with default columns of “Partition Key” and “RowKey”

Default Storage Account Table

  • To add a new custom property to the Storage Account, click on button “+ Edit”. Review that a new screen to create a custom property pops up.

Updated Add Property


  • Add the property and click save. To add rows in the table, click on button “+Add” and add the rows in the table.
  • Make a note of the values present in the column “Partition Key” and “RowKey”. These attributes will be used to retrieve the values saved in azure storage accounts.

Code Snippet to retrieve values saved in the Azure Storage table

Mentioned below blog from Microsoft shows how to retrieve a particular row from storage account table using a key value

https://docs.microsoft.com/en-us/dotnet/api/microsoft.windowsazure.storage.table.tableoperation.retrieve?view=azure-dotnet


Azure Function .Net Core 2.0 Authentication Using JWT Libraries With Certificate

Problem Statement – The blog caters to explaining a use case in which we used JWT libraries to authenticate calls between two different environments.

The consumer application is an Azure Function App deployed on Azure Cloud which needs to monitor calls happening from another application.

Background – The central idea behind the integration is to ensure that the authentication mechanism follows the same guidelines even if the consumer application is changed from Azure Function to something else.

In am Azure Function we can use the mentioned below authentications

a) Active Directory Authentication with Cloud AD.

b) Authentication with other identities provider like Facebook, Gmail etc.

c) App Service Authentication using OAuth2 token validation.

In this particular implementations, as illustrated in the diagram, there could be multiple consumer applications each following their own authentication guidelines.

Source to Target Interaction

Using JWT libraries, we can lay down a framework

a) Which will involve no change in the source application.

b) A consistent authentication which can be implemented in different consumer applications irrespective of there underlying implementation.

Implementation Approach-

In this particular example, we will discuss the approach using Certificates. As illustrated in the diagram, mentioned below steps will be executed

Authentication Approach

a) Encoding the data which needs to be transferred using a Private Certificate.

b) When we use JWT libraries to encode, it creates three sets of encoded characters

Header – Containing the algorithm used for encoding.

Payload – Containing the encoded object, time at which the payload was generated.

Signature – Secret which needs to be verified while authentication.

c) In the consumer application, decode the data using the public certificate. If required we can also pass some other parameters like Validating lifetime of the event, Validating issuer of the event etc.

As a side note, in an Azure Function, we can save the certificates in SSL settings.

Azure Function SSL.png

SSL Certificate

Please note that to use the public certificates , as highlighted in the above screenshot, the hosting Plan of the Azure Function App must be “App Service Plan” and not “Consumption Plan”

Code Snippet

Mentioned below indicates a code snippet which can be used for the reference. Please note we will need to install a Nuget package for the JWT library as well. Please refer below the screenshot for the same

Nuget Package to Use

// Deserialize the request and retrieve the event details

NotificationEvent ObjModel = JsonConvert.DeserializeObject< NotificationEvent >(JsonContent);

var tokenHandler = new JwtSecurityTokenHandler();

//Thumbprint of Certificate to use

string thumbprint = “XXXXXXXXXXXXXX”;

// Loading the Certifications in Azure Function

X509Store certStore = new X509Store(StoreName.My, StoreLocation.CurrentUser);

certStore.Open(OpenFlags.ReadOnly);

// Finding the Certifcate based upon the thumbprint

X509Certificate2Collection certCollection = certStore.Certificates.Find(

X509FindType.FindByThumbprint,

thumbprint,

false);

if (certCollection.Count > 0)

{

var certificate = certCollection[0];

// Reading Key from the Certificate

var rsa = certificate.GetRSAPublicKey();

// Creating the parameters which will be used for JWT token verification

var validationParameters = new TokenValidationParameters

{

IssuerSigningKey = new RsaSecurityKey(rsa),

ValidateIssuerSigningKey = true,

ValidateIssuer = false,

ValidateLifetime = true, // This will validate the lifetime of event also.

ValidateAudience = false

};

   // This will throw exception if the validation fails     

var principal = tokenHandler.ValidateToken(ObjModel.Notification, validationParameters, out SecurityToken securityToken);

}


Active BPF Issue Migrating from Dynamics 2016 to Dynamics 365 – Resolution

Problem Statement

The blog is in continuation of my previous blog wherein we explored possible BPF related issues after migration from Dynamics 2016 to Dynamics 365.

In this blog we will explore the resolution strategies for all the BPF migration issue that we encountered in the last blog.

To refresh the context, mentioned below were the issues which we encountered when Dynamics was upgraded from 2016 to 365

Dynamics 365 BPF design change causing the mentioned below issues

  1. Each user may see a different active BPF on the same record. Causing user perception and usability issues.
  2. Out of box workflows triggering on change of process and stage id fields behaving weirdly.
  3. Out of box workflows doing comparison on stage id and process id field values giving different results for different users.

Resolution

Setting Same BPF for all Users in Dynamics 365

In Dynamics 365, by default “SetProcess” action or “SetProcessRequest” will only set the active BPF for the user in whose context the request is being executed and not for all the users present in Dynamics. There are two possible ways of tackling the situation

  1. Using a Workflow Code activity to execute SetProcessRequest for all the users in Dynamics

The idea behind this is to execute the “SetProcessRequest” for all the users in dynamics for the target record. Mentioned below is a code snippet for the same

Img 1

Mentioned below is an analysis on Pros and Cons of this approach

PROS

  1. We can configure the workflow code activity to run when the record is created. It will be a synchronous operation and will reflect for all the users immediately.

CONS

  1. There is a 2-minute timeout constraint in the workflow assembly. Therefore, depending upon the number of users for which we want to set the same BPF, there are chances that the request will timeout.
  2. In the above example, I am looping through all the records in Dynamics. However, in real world scenario’s not all the users may have required license or access to the BPF record. Therefore, for those users, we will encounter exception in the request. To navigate through that, we will need to only pass the users that are essential for setting the same BPF.
  3. We will need to be careful when we are using the “SetProcessRequest”, because if there is already an active instance for the BPF against the target entity, it will not preserve the same stage value but rather then overwrite the previous instance of that BPF.

2. Using client side API to check the active BPF for the logged in User and changing it

In this approach, the idea is to check the BPF process which is currently active for the logged in user and changing it in form on load event depending upon the business requirement. Mentioned below is the JavaScript code snippet for the same

img 2

PROS

  1. The JavaScript code snippet can just be embedded in the form on load event and will be easy to maintain and change.

CONS

  1. After setting the correct BPF for the user, there will be a onetime reload of the form. This may cause some user experience issue as compared to the first approach.
  2. This approach will only change the BPF for the user, once they open the form. Therefore, at the backend, the system will continue to store different values of stage id and process id for each user.
  3. Due to this it is imperative that the mentioned below steps related to retrieving active stage and process are implemented instead of doing a direct comparison with the stage and process id fields.


Configuring out of box workflows triggering on change of stage and process id fields

Till Dynamics 2016, it was a supported way to run workflows on update of stage id and process id values. For example, mentioned below is an out of box workflow which is triggering on update of stage and process values on a record.

img3

img4

However, in Dynamics 365, with the presence of multiple active BPF’s on an record, this will need to be changed. Mentioned below is the reason for the same.

  1. Suppose in CRM 2016, there were two BPF’s A and B on the record. At a time, only one could be active. Therefore, the above-mentioned workflow would have triggered only for the active process.
  2. However now there are multiple active BPF’s on the record. Therefore, the above process will trigger for each of the two BPF’s. This might cause some issue.

Due resolve this situation, we need to make the mentioned below changes in the workflow and the corresponding BPF in which we want to trigger the workflow

  1. Make the process On Demand and remove any on change events in it.

The first step which we need to do is to make the workflow on demand and remove any change events which are mentioned in the workflow

img52. Calling the workflow from stage event in the BPF.

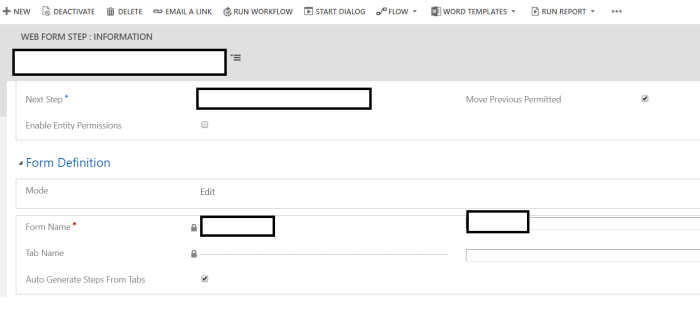
This is a newly introduced feature in BPF’s. In a BPF we can now add a step that will run a On Demand workflow when a stage in entered or exited. Mentioned below are the steps for the same

img6a) Select a stage and click on the “+ Add” button and select “Add Workflow”. Review that a workflow step is added on the stage.

img7b) Now for the workflow step, select the appropriate Trigger and workflow. Trigger can assume two values “Stage Entry” and “Stage Exit”. In the workflow lookup, we can select any active on demand workflow set on the same entity as the BPF target entity. i.e. “account” in our example

img8

c) After specifying all the details, click on “Apply” and then “Validate” and “Update” the BPF.

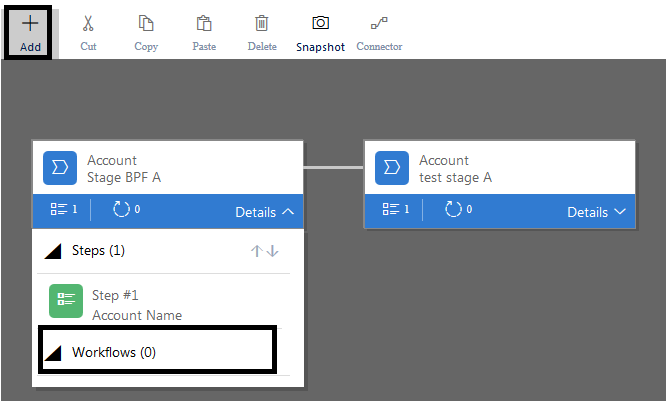
Configuring out of box workflows doing active stage and process name comparison on the target entity

As described earlier with the advent of Dynamics 365, there can be multiple active BPF’s on the same target record. Moreover as discovered in the previous blog, each user may have a different value of stageid and processid value depending upon the active process set for that user.

Therefore, in our out of box workflows, we cannot do a direct comparison on the stage and process name values. Mentioned below screenshots describe the changes that we need to in these kind of workflows

a) Mentioned below is a screenshot showing a basic example of a workflow where we were comparing the values of stage and process name before executing a step

img9

img10

Any such workflows may cause some issues. Mentioned below steps shows how we can correct the above-mentioned issue.

b) While suggesting the solution, I am assuming that we are interested in finding out the current stage of the active instance of a particular BPF process

In this case, we need to write a custom workflow code activity to make the mentioned below C# sdk requests.


/// <summary>

/// Retrieving current process active stage as per the design changes introduced in Dynamics 365

/// </summary>

/// <param name=”service”></param>

/// <param name=”currentTargetRecordID”></param>

/// <param name=”currentTargetLogicalName”></param>

/// <returns></returns>

protected string RetrieveActiveStageName(IOrganizationService service, Guid currentTargetRecordID, string currentTargetLogicalName)

{

string activeProcessName = “”;

string activeStageName = “”;

// Retrieves all active BPF instances for an entity

RetrieveProcessInstancesRequest activeProcessReq = new RetrieveProcessInstancesRequest

{

EntityId = currentTargetRecordID,

EntityLogicalName = currentTargetLogicalName

};


RetrieveProcessInstancesResponse activeProcessResp = (RetrieveProcessInstancesResponse)service.Execute(activeProcessReq);


if (activeProcessResp.Processes != null)

{

if (activeProcessResp.Processes.Entities != null)

{


int processCount = activeProcessResp.Processes.Entities.Count;


if (processCount > 0)

{

for (int i = 0; i < activeProcessResp.Processes.Entities.Count; i++)

{

var processInstance = activeProcessResp.Processes.Entities[i];

activeProcessName = processInstance.Attributes[“name”].ToString();

// Display name of the BPF for which we need active stage

if (activeProcessName.Contains(“BPF A”))

{

var _activeStageId = new Guid(processInstance.Attributes[“processstageid”].ToString());

// Retrieving all the stages available in the BPF

RetrieveActivePathRequest pathReq = new RetrieveActivePathRequest

{

ProcessInstanceId = processInstance.Id

};


RetrieveActivePathResponse pathResp = (RetrieveActivePathResponse)service.Execute(pathReq);


// Display name of the BPF for which we need active stage Looping through the stages and selecting the active stage

for (int j = 0; j < pathResp.ProcessStages.Entities.Count; j++)

{                                                           pathResp.ProcessStages.Entities[j].Attributes[“stagename”],

pathResp.ProcessStages.Entities[j].Attributes[“processstageid”]);


// Retrieve the active stage name and active stage position based on the activeStageId for the process instance

if (pathResp.ProcessStages.Entities[j].Attributes[“processstageid”].ToString() == _activeStageId.ToString())

{

activeStageName = pathResp.ProcessStages.Entities[j].Attributes[“stagename”].ToString();

}

}

break;

}

}

}

}

}


return activeStageName;

}


We will then add the above-mentioned code as a workflow code assembly and register it as a step in the out of box workflow

img11